Lights, Tableau, Action: Adding Salesforce Actions to Your Tableau Dashboard
We’ve all been there. You open a dashboard, find a glaring issue in the pipeline, and then you stop. To fix it, you’ll have to leave your analytics, open a new browser tab, search for the record in the CRM, and manually perform the update.
This friction is the “Analysis Gap.” It is the distance between seeing a problem and having the power to solve it. For years, dashboards have been treated as passive reports, a way to look at the past. But the next evolution of analytics is here: The Revenue Command Center.
In a Command Center, the dashboard isn’t just a visualization. It is the action itself.
From dashboard to Command Center
The shift from a traditional dashboard to a Command Center is a shift in mindset. A traditional dashboard answers “What happened?” A Command Center answers “What do we do now?” and provides the button to do just that.
By integrating Salesforce Flows directly into Tableau, we move away from traditional dashboards and toward actionable velocity. The goal is simple: reduce the number of clicks-to-resolution. When a user identifies a record that needs attention, they shouldn’t have to navigate away to fix it. They can just do it right inside the dashboard.
Inside the Command Center
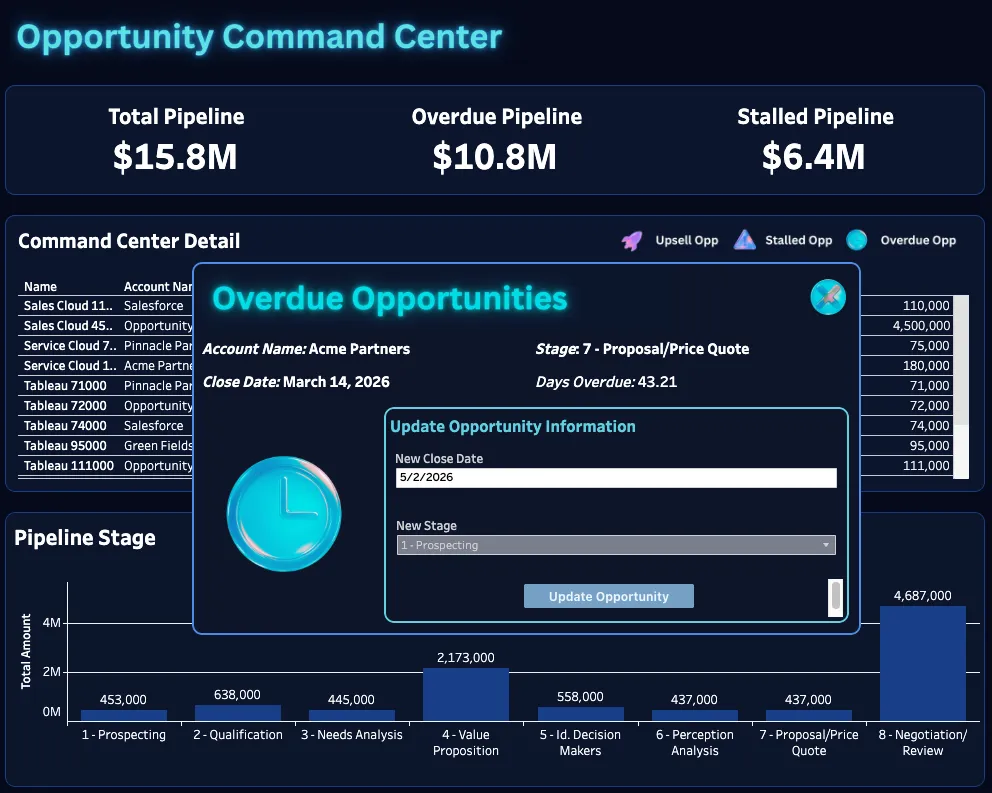
Transforming a worksheet into an actionable tool requires a bit of backend configuration. For this blog post, we’ve created a Command Center dashboard designed to allow users to manage their opportunity pipeline directly from within the dashboard. With KPIs like Total Pipeline and Pipeline by stage, reps receive the same information they normally would in a BI solution. However, the centerpiece of this dashboard is the Command Center. Here, opportunities that need or warrant attention are flagged directly in the table. These flags include:
Overdue Opportunities: Pipeline opportunities where the Close Date is in the past
Stalled Opportunities: Pipeline opportunities that haven’t had any movement in the last 30 days
Upsell Opportunities: Pipeline opportunities that are eligible for an upsell campaign

From these, by clicking on an icon, we’ll see a pop-up which prompts us to take action on the particular opportunity we’ve selected. That’s the key aspect of adding Salesforce actions to our Tableau dashboards: embedding them into the workflow in a simple, easy flow.
Configuring actions in Salesforce
Before we configure our actions in Tableau, we’ll need to set up the “pipes” in Salesforce that will power the changes we want to make in the dashboard. The pipes are Salesforce Flows. These flows allow you to make changes to the opportunities in the Tableau dashboard without any manual work from the user. For this example, we’ll be configuring three flows based on our pre-defined opportunity adjustments.
Overdue Opportunities: Pipeline opportunities where the Close Date is in the past
- Allow users to update the Close Date and Stage
Stalled Opportunities: Pipeline opportunities that haven’t had any movement in the last 30 days
- Allow users to create a task logging a call or meeting with the customer
Upsell Opportunities: Pipeline opportunities that are eligible for an upsell campaign
Allow users to create an upsell opportunity with a product campaign swap between the genres and sub-genres, or limiting the visual to only include headliners. But those are topics for another blog.
Overdue opportunities: updating the pipeline
An opportunity with a Close Date in the past represents a risk to forecast accuracy. In the Command Center, these are highlighted with an Overdue Flag.
Instead of an administrator chasing down reps for updates, the user can remediate the record directly. By clicking the flag, a Salesforce Flow is triggered that requires two specific inputs:
- New Close Date
- Updated Stage
In the flow, we’ll be defining 3 variables, one for each of the inputs the flow takes: the Opportunity ID, which is the ID of the opportunity we selected in the table, the New Close Date, and the Updated Stage.
Setting up the flow in Salesforce
In Salesforce, a flow can be created by going to “Flows” under Process Automation in Setup. From there, you can select “New Flow” and select “Autolaunched Flow (No Trigger)”. In order to connect to Tableau, flows within Salesforce must be an autolaunched flow type. This means that the flow is triggered in the background, and no user interaction (within Salesforce) is necessary to trigger the flow. Also note that the user referencing the flow will need access to view the flow in Salesforce in order to create the workflow automation in Tableau. This can be done by selecting “Edit Access” in the dropdown menu and enabling the corresponding user profile. This will need to be done for each flow created.
Beyond that, setting up the flow within Salesforce is relatively simple, depending on the action you want to accomplish. Make sure to create the three input variables for each item you are trying to update, as mentioned above. Under resources, we have created the following three “Available for Input” variables that are then mapped to variables/parameters created in Tableau:
- varOppID – text data type
- varNewStage – text data type
- varNewCloseDate – date data type
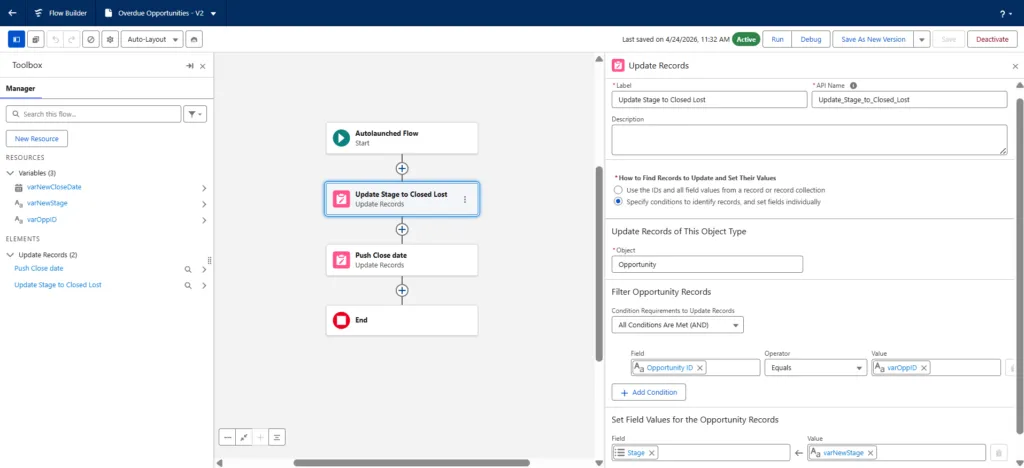
For the Overdue Opportunity action itself, there are two “Update Records” elements. The first, Update Stage to Closed Lost, updates the stage within the user-selected opportunity record in Tableau with the value from the new stage variable. The associated settings are as follows:
- Create label and API name
- For “How to Find Records to Update and Set Their Values” choose “Specify conditions to identify records, and set their fields individually”
- For “Object” choose “Opportunity”
- Make sure “All Conditions Are Met (AND)” and the “Opportunity ID” Equals “varOppID”
- Lastly, the “Stage” field value should be “varNewStage”
An additional “Update Records” element can be created next, with the only difference being the label/API name, as well as the final “Close Date” field value should be “varNewCloseDate.” After that, the first “Overdue Opportunity” flow has been created.
Configuring the Workflow object in Tableau
Now that we’ve developed the Flow, we can configure our Workflow object in Tableau. Before we do that, we need to ensure we have all the inputs that the flow requires. To do this, we’ll need to create a parameter for anything that the user will be expected to define. For this flow, we’ll make a new String Parameter where the user can input the New Stage. We’ll create a List based on the Stage Name field from our data source. Next, we’ll make a New Close Date, a date parameter, which allows the user to push out the close date to a new value. On the dashboard pop-up, you can see those values populated.
Now, let’s pull in the Workflow object on the Tableau dashboard. Once we’ve done that, we’ll need to configure the flow. There are a few steps for that.
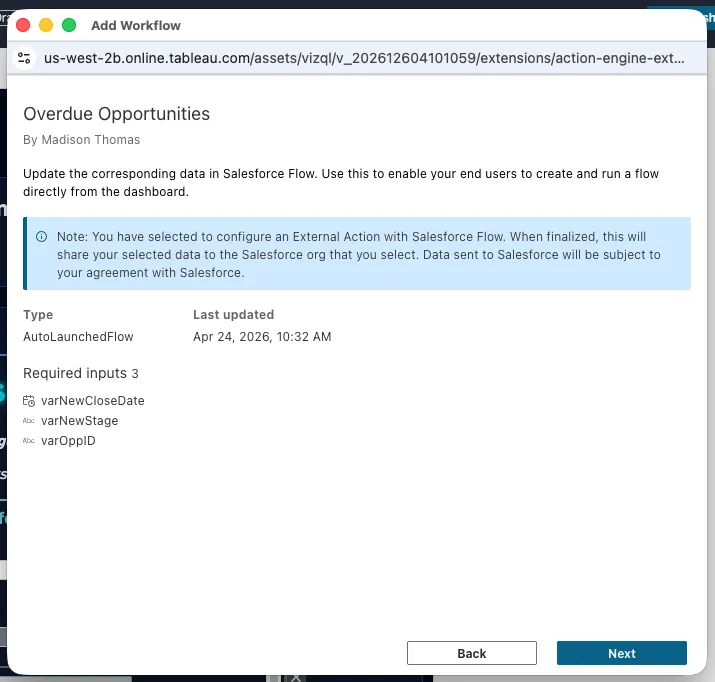
1. Select to Configure Flow and find the flow we’ve created, Overdue Opportunities.
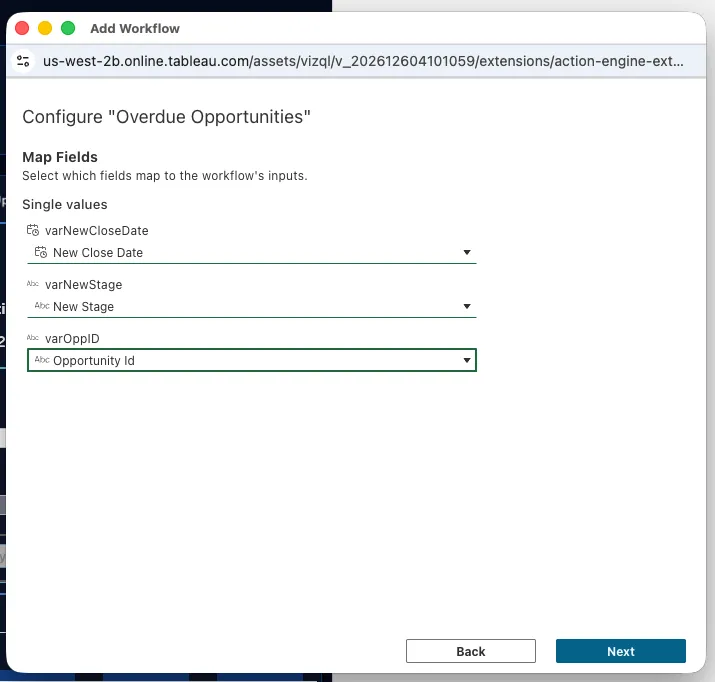
2. Here, you’ll see the Variables you’ll need to define, which we discussed earlier. We have three for this flow: the New Close Date, the New Stage, and the Opportunity ID.
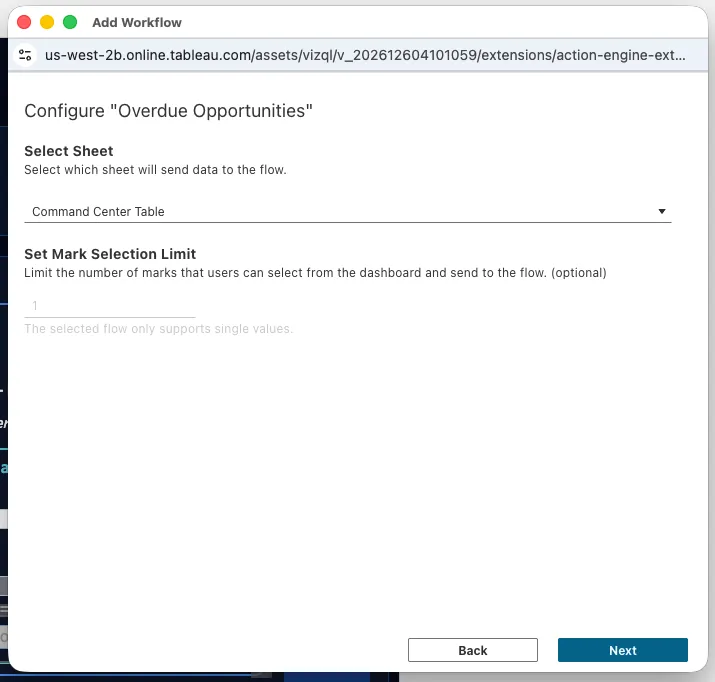
3. The next page will allow us to choose which sheet we want to pull the metrics from, if not from a parameter. In this case, we’ll be pulling from the Command Center Table to grab the Opportunity ID to update.
4. On the next page, we’ll need to map these variables to the parameters and values from the columns of the table we’ve created.
5. Update the button label to represent what the flow will do. We’ve updated ours to say Update Opportunity. Hit submit, and you’re done.
And that’s it. Now we have a fully managed opportunity update flow built into the dashboard.
Stalled opportunities: logging a task
We define a Stalled Opportunity as any deal where the Last Action Date was more than 30 days ago. Rather than just viewing the delay, the Command Center provides a Clock Icon to trigger a Stalled Opportunity Flow. This action allows the user to log an immediate outreach task to “reset the clock.”
This time, our variables will include identifying what kind of task to log (Call, Meeting, etc.), the subject of the meeting, and a brief description. We’ll create parameters this time for these three values and include them on our pop-up page. Note that a new type of element will need to be included here in addition to the “Update Records” element. This new element is called “Create Records.” Instead of updating an existing record, this element will manually create a task record and set the field values accordingly.
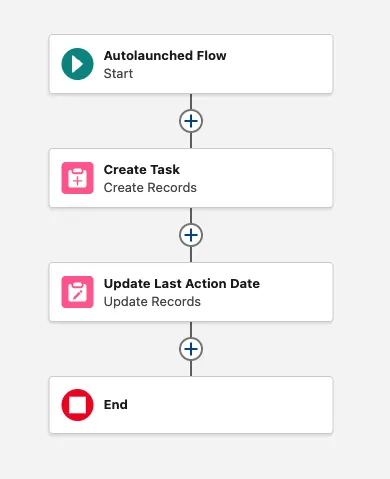
This logic will create a new completed task, including a meeting, call, or task of any kind, to reset the Action clock on this stalled opportunity.
Upsell opportunities: increasing the pipeline
Growth isn’t just about finding new leads. It’s about identifying whitespace within existing accounts. By aggregating historical data, Tableau can identify accounts that have Closed Won CRM Analytics deals but have no active Tableau+ pipeline. When the Rocket Icon appears, it indicates a high-propensity upsell opportunity.
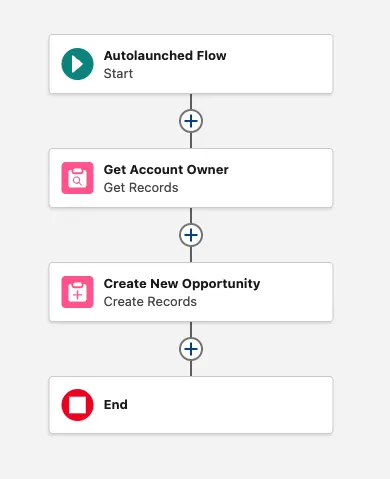
For this flow, the Upsell Opportunity Flow, since we’re creating a new opportunity, we’ll need a few things: Name, Amount, Close Date, and Product. These will be the metrics we’ll create as parameters for this flow. We can grab things like AccountId from the table we selected the rocket emoji from. You’ll notice the trend is the exact same between all these flows. We create parameters, match them up to the variables in the flow, and pull the rest of the variables from the command center table. Additionally, a “Get Records” element is necessary to find the associated Account Owner of our input account and paste it into an Account Owner variable that can then be referenced in the “Create Records” element as the owner of our newly created Opportunity record.
Turning analytics into action
The ultimate goal of the Opportunity Command Center is to eliminate the need for swivel-chair management. By building workflows into your dashboards, you achieve:
- Significant Time Savings: Eliminating the search-and-find process in the CRM.
- Reduced Navigation: Keeping users within a single “source of truth.”
- Data Integrity: Making it easier to fix data than to ignore it.
We’ve all been there, staring at a problem on a screen. The next step is to stop looking at the problem and start clicking the solution. Build your workflows into your dashboards and turn your analytics into actions.