Build and Deploy a Docker Containerized Python Machine Learning Model On Heroku
Have you ever faced any trouble while deploying a machine learning model on a production system? Or what if the model is working on your machine, but when it comes to the production system or the client’s machine, it is not working or throwing unexpected errors?
Here we’ll focus on an approach from building a basic machine learning model to deploying it on production using Docker without worrying about the platform of the target machine.
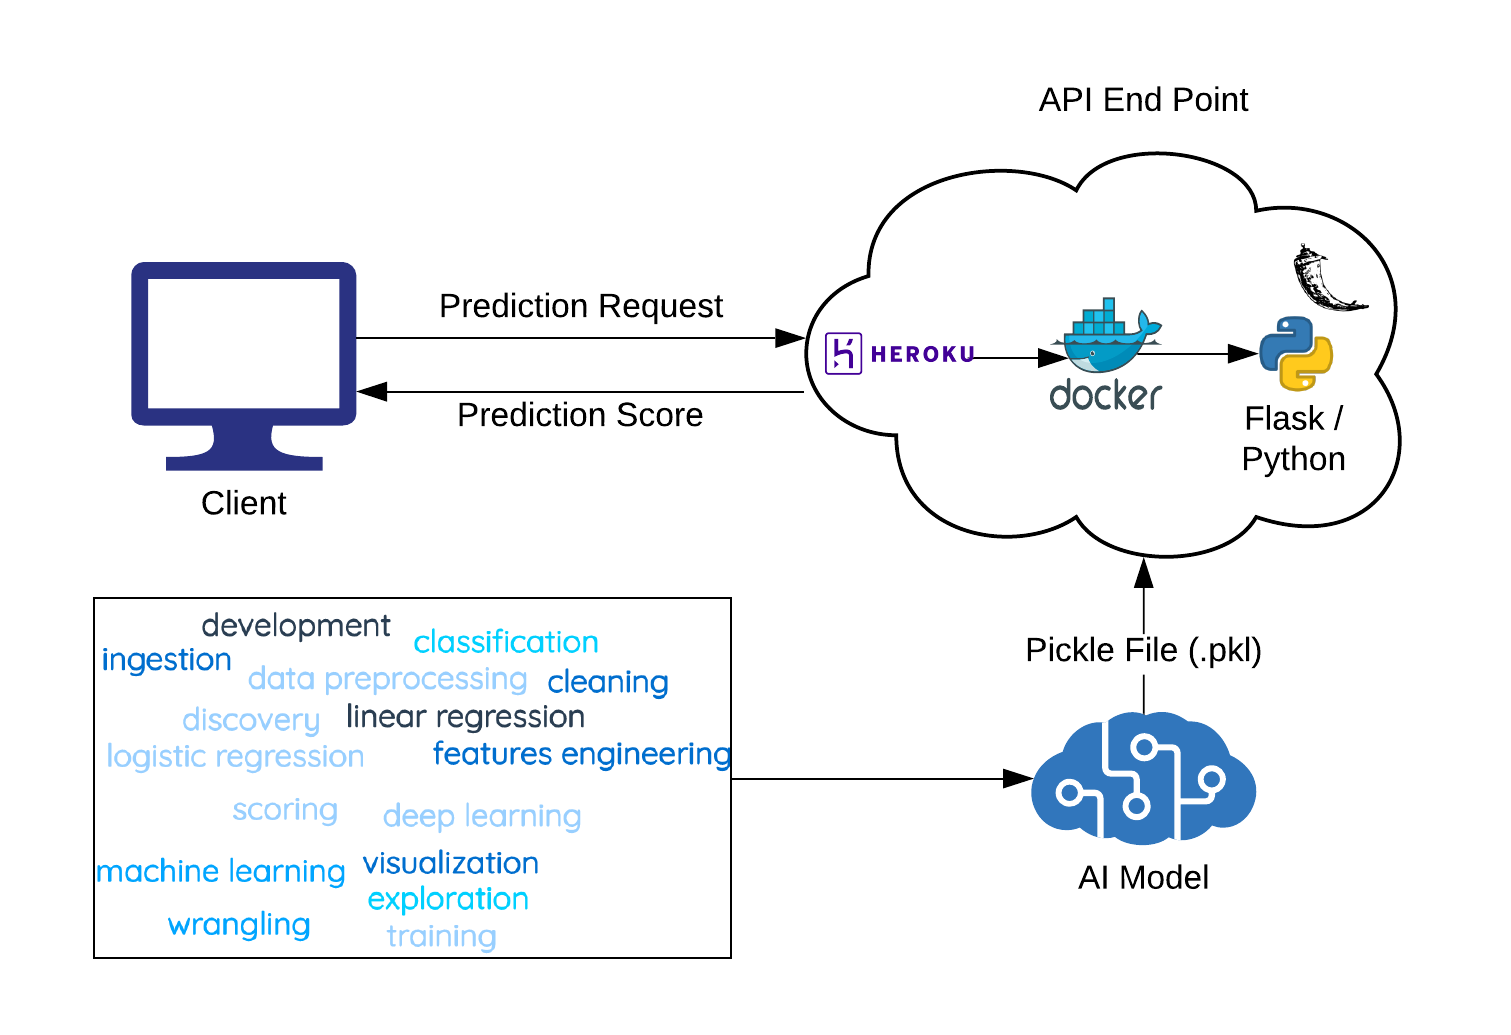
We’ll discuss each component of the above architecture diagram and then focus on the implementation of the whole system using an example of an iris flower species classification problem.
What is Docker and Why is It Needed?
Docker is a containerization technique that is used to deploy software applications to both cloud platforms and on-premise servers. Previously it was a nightmare for developers to keep the development and production environment similar because the code may break on production if they are not similar. But with the help of Docker, it is quite easy to create, deploy, and run applications.
With the help of containers, developers can package their application in a single part along with all the dependencies, freeing them to deploy this application anywhere without worrying about any dependencies. This is the definition of a container given by Docker: “A container is a standard unit of software that packages up code and all its dependencies so the application runs quickly and reliably from one computing environment to another.”
What is Flask?
Flask is a Python-based web framework that can be easily installed using pip. Many tools, libraries, and predefined standards come with this framework, so it becomes easier to build a web application or APIs. It is considered a micro-framework. Micro-frameworks are typically frameworks with little to no dependency on external libraries. Here, we are going to use Flask to build APIs.
We’ll also discuss the exporting of the model, then expose the model as an API endpoint, and then containerize the machine learning app and run it on the Docker engine.
Create a Machine Learning Model and Expose It as an API Endpoint
Building a Machine Learning Model
In this section, we’ll build a basic machine learning model that will classify the different species of iris flowers. For training and testing of the model, we will use the inbuilt dataset that comes with the sklearn Python library. Create a file “mode_training.py” and add the below code snippets in that file.
First, load the dataset from sklearn.
from sklearn import datasets
iris=datasets.load_iris()
Separate features and target labels in different data frames.
x=iris.data
y=iris.target
Because we will train the model and test the accuracy, split the dataset in train and test with the following code.
from sklearn.model_selection import train_test_split
x_train,x_test,y_train,y_test=train_test_split(x,y,test_size=.3)
Build the model using KNeighborsClassifier.
from sklearn import neighbors
knn=neighbors.KNeighborsClassifier()
Train the model and then do prediction on the test dataset and calculate the accuracy of the model.
knn.fit(x_train,y_train)
predictions=knn.predict(x_test)
from sklearn.metrics import accuracy_score
print(accuracy_score(y_test,predictions))
We have built a machine learning model. Now, we will export the model coefficients in the pickle file. It stores the coefficients in the serialized form and then we can import this file for prediction in the future so that we don’t need to train the model each time.
import pickle
with open(‘./model.pkl’, ‘wb’) as model_pkl:
pickle.dump(knn, model_pkl)
We have finished the model development and stored the classification model into a pickle file. Run “model_training.py” file. After running the above script, the pickle file will be stored in the same directory where our model file exists, and we can change the path of this file as per our directory structure.
Next, we will focus on the deployment of this model so that it can be used to predict the output of unseen data. We will load the pickle file and will call the predict method. Create a “prediction_record.py” file and add below code snippets in that file.
# Import all the package
import pickle
import numpy as np
from sklearn.neighbors import KNeighborsClassifier
# Load the model into memory
with open(‘./model.pkl’, ‘rb’) as model_pkl:
knn = pickle.load(model_pkl)
# Test data
new_record = np.array([[1.2, 1.6, 1.8, 2.4]])
predict_result = knn.predict(new_record)
# Print result to the console
print(‘Predicted result for observation ‘ + str(new_record) + ‘ is: ‘ + str(predict_result))
In the above code, we passed the new unseen data in the form of hardcoded value — but we want to serve our model as a service. There will be an API endpoint so that we can call the API with the four values (i.e., sepal length, sepal width, petal length, and petal width, respectively) and the API function will return the predicted output obtained from the trained model.
Next, we will build the API server, and then we will containerize it in a Docker container.
Building API with Flask and Containerizing it in Docker:
Step 1: Create a folder named “python_docker_heroku”
mkdir python_docker_heroku
Point your current directory to this folder.
cd python_docker_heroku
Move the “model.pkl” file that was created at the time of model training into this folder.
Step 2: Create a Python script file “app.py.” This file will serve all the API requests and add our prediction code explained in previous steps of this block inside a function “predict_iris.” This function will be called by API endpoint after the initialization of the Flask app. It accepts the four variables for prediction as GET parameters.
import pickle
# Import all the packages you need for your model below
import numpy as np
import sys
import os
from sklearn.neighbors import KNeighborsClassifier
# Import Flask for creating API
from flask import Flask, request
port = int(os.environ.get(“PORT”, 5000))
# Load the trained model from current directory
with open(‘./model.pkl’, ‘rb’) as model_pkl:
knn = pickle.load(model_pkl)
# Initialise a Flask app
app = Flask(__name__)
# Create an API endpoint
@app.route(‘/predict’)
def predict_iris():
# Read all necessary request parameters
sl = request.args.get(‘sl’)
sw = request.args.get(‘sw’)
pl = request.args.get(‘pl’)
pw = request.args.get(‘pw’)
# Use the predict method of the model to
# get the prediction for unseen data
new_record = np.array([[sl, sw, pl, pw]])
predict_result = knn.predict(new_record)
# return the result back
return ‘Predicted result for observation ‘ + str(new_record) + ‘ is: ‘ + str(predict_result)
if __name__ == ‘__main__’:
app.run(debug=True,host=’0.0.0.0′,port=port)
In the above code snippet, we created a Flask application that will run on 5000 port and define a route/predict that will use “predict_iris” method. This method will accept the input parameters and do the prediction with the help of a pre-trained model. The pretrained model is loaded from the pickle file that we created in the model development phase.
Step 3: Create a file named “requirements.txt.” This file will hold all the dependencies required to run our Python application. In our case, we need the below dependencies, so add the below into that file. We add the version number of the module along with the name to avoid any mismatch in the version of the module.
Flask==0.10.1
sklearn==0.0
scikit-learn==0.23.1
Step 4: It’s time to create a Docker file. It will help us to build the Docker image. Create a file named “Dockerfile.” We will use Ubuntu as our base image and will install Python3 in it. Write the below code in the “Dockerfile” you created.
FROM ubuntu:latest
RUN apt-get update -y
RUN apt-get install -y python3-pip python3-dev build-essential
COPY . /app
WORKDIR /app
RUN pip3 install -r requirements.txt
ENTRYPOINT [“python3”]
CMD [“app.py”]
Step 5: Build the Docker image locally and then run the Flask application to check whether everything is working properly on the local machine before deploying it to Heroku.
docker build -t flask-heroku:latest .
docker run -d -p 5000:5000 flask-heroku
Let’s run the app on the local machine. Open this URL into your preferred browser:
http://localhost:5000/predict?sl=1.2&sw=1.7&pl=1.8&pw=2.1
It will return the predicted output from the model.
Step 6: If the Python application is working fine on your local machine, it’s time to deploy it on Heroku.
Log into Heroku Container. Run the below command in the terminal.
heroku container:login
After successful login, you will see the message “Login Succeed.” The next step is to create an app on Heroku. If you define the name of the app, Heroku will create an app with the specified name (or else Heroku will choose a name for you).
heroku create
or
heroku create <your_app_name>
Before running this step, check that you are in the same folder where your “app.py,” “Dockerfile,” and other files exist.
Now, execute the below command; this command will push the container onto the Heroku app.
heroku container:push web –app <your_app_name>
Now our Docker container has been pushed to Docker. Still, it is not released. Run the below command to release it.
heroku container:release web –app <your_app_name>
Once it is released, you will get the message — done! If everything is working, then you can open your app created on Heroku in the browser.
Your final API endpoint URL will be:
https://<your_app_name>.herokuapp.com/predict?sl=1.2&sw=1.7&pl=1.8&pw=2.1
Looking for assistance? Check out out predictive analytics services.