How to Build Workflows Using Airflow for Machine Learning
In this blog, we are going to discuss Airflow for machine learning and how it can make the life of a machine-learning engineer easy when executing interdependent tasks. In a machine-learning project, we have various tasks, from data extraction to model deployment, and they can be executed by creating Apache Airflow workflows that implement machine-learning pipelines.
Here, we will talk about how we can leverage Apache Airflow and get rid of CRONTAB. We have to create multiple workflows, such as collecting data from various sources, preprocessing it, and storing it in a well-structured form. It’s tedious to manage all the tasks with CRONTAB and handle reporting, but with the help of Airflow, you can automate the workflow and see the report at the same time. You can also trigger an email if something goes wrong in the workflow. Academic ML has its roots in research from long ago, but the practical implementation of Machine Learning Systems in production is still relatively new.

Apache Airflow is an open-source workflow management platform that allows for programmatic creation, scheduling, and monitoring of workflows.
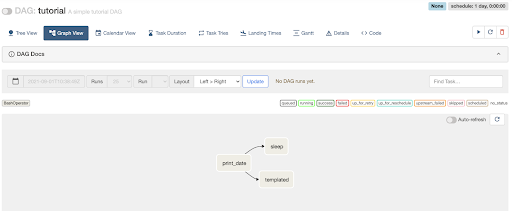
A workflow or pipeline that comprises one or more tasks that are related to each other is represented as Directed Acyclic Graph (DAG). We create a task in DAG to perform a specific action, and that is implemented by Airflow operators such as the Python operator (to execute the Python function) or Bash operator (to run the Bash command).
Why Airflow:
When there are many tools available for similar work, why use Airflow?
- It is open source and developed in Python, which provides us the flexibility to make custom changes if required.
- It comes with a fully-fledged web UI that will help you see all details in a single place and take necessary actions like manually triggering DAG or checking the logs for debugging.
- It allows us to pass variables or data from one DAG to another with the help of XCOMs.
- It has a quite active community and it is trusted by large tech companies.
- Only a bit of Python knowledge is required to get started working on Airflow.
- You can use Python to create simple to complex workflows with complete flexibility.
Setup Airflow using Docker:
Here we will set up a simple Airflow architecture with a scheduler, worker, and web server running on a single instance.
Prerequisites:
Note: On desktop systems like Docker Desktop for Mac and Windows, Docker Compose is included as part of those desktop installs.
On Linux systems, first install the Docker Engine for your OS as described on the Get Docker page, then open this for instructions on installing Compose on Linux systems.
Installation:
- Clone this repository and change your current working directory to the project repo directory.
git clonehttps://github.com/piyush-singhal/Airflow-docker.gitcd Airflow-docker - Docker Compose
To spin up the Docker container, follow the below steps.
- First, copy the
sample.envfile to.envand change the values in the.envfile. if you add some variable into your .env file, it also has to be present in sample.env.cp sample.env .env - Run the below command from the project's root directory. Please make sure the
docker-compose.ymlfile exists in the directory from where you are running this command. After this step, your system will have Airflow and Postgres installed inside the container.docker-compose up
(Optional) If you make changes in the Dockerfile and want to rebuild the image, pass the --build an argument to rebuild the image.docker-compose up --build
(Optional) Run the below command to stop containers and remove containers, networks, volumes, and images created by up.
docker-compose down
You can access the Airflow web UI by opening the below URL in your web browser.
- Airflow: localhost:8080
It will ask you to log in and you can do so with the credentials entered in the installation steps in the .env file. After logging in, you will see the below screen that has the list of all the DAGs available.
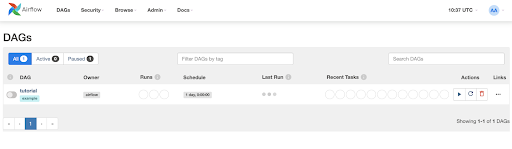
Sample DAG:
In your cloned repository, all the DAGSs will be stored in the DAGs folder.
Components of Apache Airflow:
- DAG: (Directed Acyclic Graph) – a collection of all the tasks that you want to run which is organized and shows the relationship between different tasks. It is defined in a Python script.
- Web Server: the user interface built on the Flask. It allows us to monitor the status of the DAGs and trigger them.
- Metadata Database: Airflow stores the status of all the tasks in a database and does all read/write operations of a workflow from here.
- Scheduler: As the name suggests, this component is responsible for scheduling the execution of DAGs. It retrieves and updates the status of the task in the database.
Conclusion:
Building an ML running workflow needs a lot of work and preparation, but it helps us to perform experiments quickly with easy maintenance and enables us to deliver ML models faster into production. It helps us to go away with less reliable CRONTAB.
You can further extend the workflows making changes in the Airflow DAGs with any tasks such as feature engineering and retraining of the model.
Subscribe to our blog for more technical information and industry news.