If you use GitHub for version control, you might be aware of its native CI/CD implementation. They call this feature GitHub Actions. According to GitHub, it “helps you to build, test and deploy your code directly through GitHub”. It gives you the ability to run tests and deploy code automatically. During the initial versions of GitHub Actions, these features were only event driven, meaning that you needed to specify events, such as pull requests, on which these actions would run. More recently, they’ve added the functionality to run these actions manually, which gives more flexibility to the user. We will talk about this in detail later.
What is CI/CD?
CI/CD stands for Continuous Integration/Continuous Deployment. It’s an Agile methodology that can help integrate and deploy code more effectively by automating deployment steps, which allows development teams to focus more on code quality and requirement gathering. Changes can be deployed more frequently when teams follow CI/CD principles and practices.
Some key benefits of using CI/CD:
- Enables frequent releases for better value proposition.
- Locates issues quickly before they become hard to solve.
- Reduces debugging time.
- Provides a reliable and effective system to maintain code.
Many tools exist that provide the framework necessary for CI/CD. Copado and AutoRabit, for example, are purpose-built for Salesforce DevOps. In this article, we’ll cover a tool that’s more universal. GitHub Actions, from the team responsible for its namesake, can be used for any kind of development. Better yet, it has robust documentation and a supportive community that will help when you’re stuck.
What is a Workflow?
When you talk about GitHub Actions, you talk about workflows. Workflows are configurable processes where you specify your jobs to run. This might sound difficult at first, but believe me, it’s not. Jobs are written in a YAML file, which runs when a workflow runs. We’ll go through some basic steps and syntax in the next section, but you can find the complete syntax guide here.
Sample Workflow
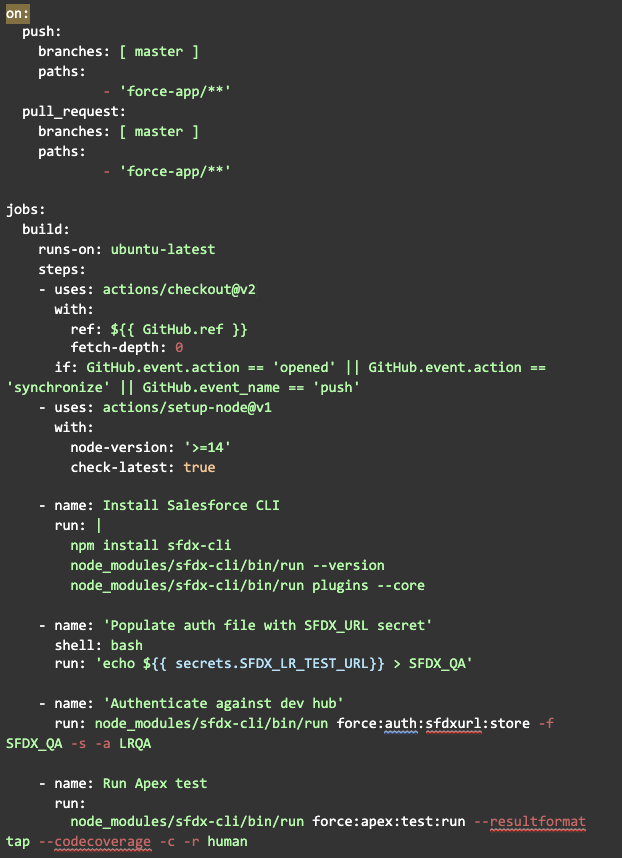
For reference, I have created a gist where you can get the source code for this workflow.
Let’s take a look at what this workflow is made of.
Name
The name of the workflow or job will be used for identification in the build logs, where you can view the workflow and jobs’ statuses. If you omit the name of the workflow, GitHub uses the path to that workflow from the root of the repository.
On
This is a required field that indicates the event or events that trigger the workflow. You can pass a string, a list of strings, or a map. In the above example, we specify that the workflow should run on push and pull requests.
To see a list of all the events that can trigger a workflow, visit Events that trigger workflows.
On push/pull_request with branches
The ‘branches’ tag refers to the branch name on which the workflow should run. We have used the master branch as the reference branch in our case. If you want to ignore specific branches, use ‘branches-ignore’ with the push/pull_request tag.
On push/pull_request with path
Jobs
Each workflow is made up of one or more jobs, which are the pieces giving life to your functionality. By default, each job runs parallel, but you can make them run sequentially. A virtual environment must be specified for these jobs to run.You can do this by using the ‘runs-on’ keyword. This is a required field.
Id
The unique id of the job is a string and stores the job’s configurational data as its value.
Shell
You can specify on what shell the job should run on. One such example would be bash.
Run
These are the commands that get executed when this particular job runs. If it’s a single command, you can write it directly. For multi-line commands, use a ‘|’ sign before the commands.

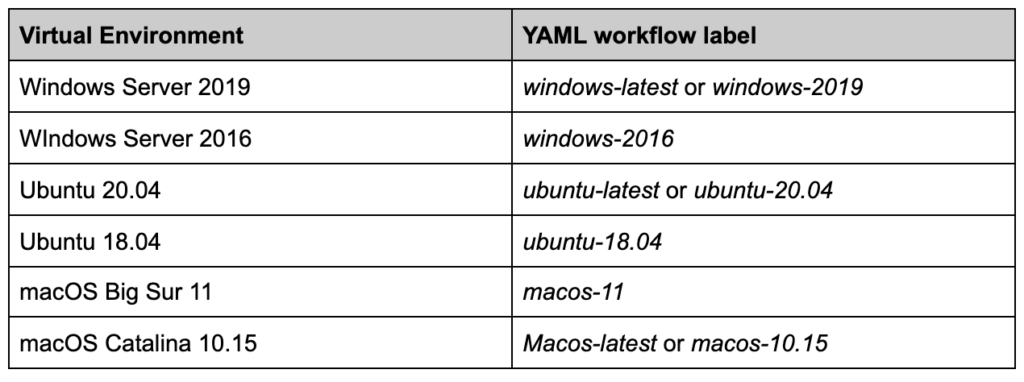
To create an environment for your job to run, use the ‘runs-on’ keyword. The supported environments are listed below.
In our example, we used ubuntu-latest.
Installing Node in our environment
In our workflow, we’ll be using the sfdx commands. First, we need to install the sfdx-cli in our environment, which we’ll do with Node Package Manager (npm). To use npm, we need to have Node installed in our environment.
To install Node, use the uses keyword along with the build information.

You should have a separate job to install the sfdx-cli in the environment.
Use the npm command npm install sfdx-cli to install it.
Now since we have installed the CLI, we can run all the sfdx commands in our environment.
Steps to authorize an org in the workflow
For a workflow to run, you need to provide a way for the flow to authenticate against an org to make any deployment or changes to the org. There are a couple of ways to do this, but the below method is the one I have found to be the easiest and most effective.
For this, you need to have VS Code with sfdx-cli installed. If you don’t have it, please check out my other blog here, which contains steps for installing sfdx-cli.
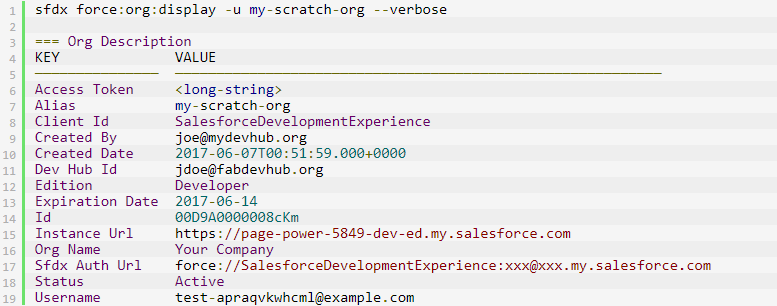
In VS Code, open a terminal by pressing Control-Tilde (ctrl + ~). Enter the following command in the terminal.
sfdx force:org:display –targetusername –verbose
Use the username of the org you want to authorize along with –verbose. This will display information about the org. We need the access token, client Id, and Sfdx Auth Url.
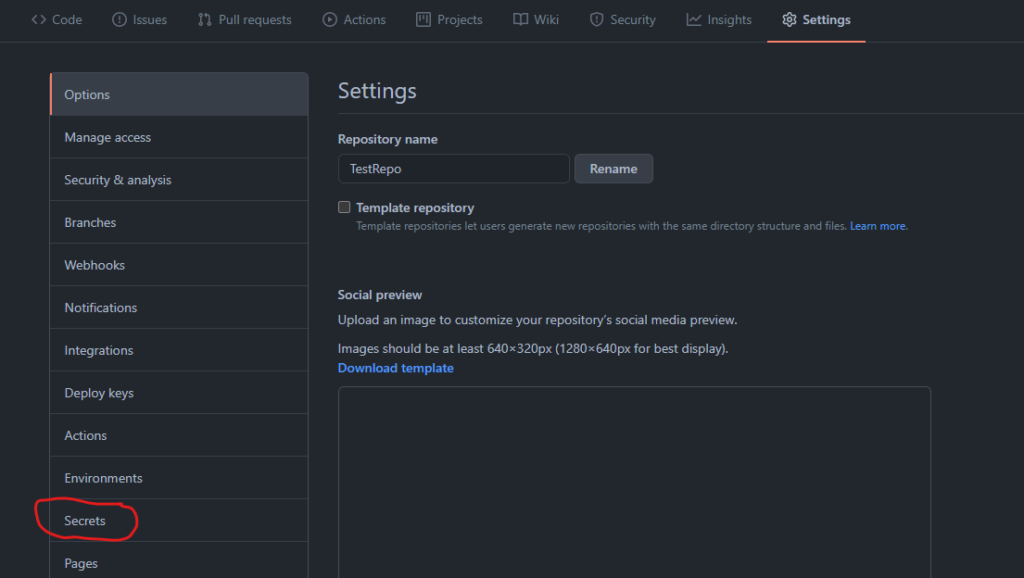
Now you need to store this information in the secrets folder of your GitHub repository (Settings > Secrets) so that it is private.
You’ll find a New Repository Secret button there, which you can use to add a secret key. After doing this, we need to tell our workflow to use that secret key.
We can see the secret keys in our workflow using the secret.<name_of_the_key> keyword.
In the image above, I’m first storing the secret into a variable named SFDX_QA and then using the variable to authorize. You can directly use the secret as well.
Conclusion
We can see that in our case, on every push and pull request to the master branch, our workflow will authorize an org, run all the test classes, and deploy our changed code to that org if everything works out. This saves developers time and effort since all these things would otherwise need to be done manually. Plus, GitHub Actions provides your project with a version control system. This also helps with debugging, since troubleshooting is way easier when issues are caught early. All this time and effort can be used in other departments of the software development lifecycle.
Learn more about our Salesforce consulting services.


