Contributing Authors: Tyler Pollard, Emma LeMasters
This is the second post in a short blog series focused on preventing customer churn using a centralized data hub. Here’s an infographic version of the series!
Getting the Right Data with the Right Tools
As mentioned in Part 1 of this series, our fictional company, Magenta Inc., is facing customer churn. One issue identified in that post is that a Senior Sales Representative, Elaine Gadget, is unable to see customer service cases and order fulfillment data. Getting this information into Salesforce would enable her to see issues as they arise and proactively reach out to her customers before they churn.
At Magenta, Jake Custer is the Senior Data Architect. Part of his job is to identify systems and their data that are needed for integration to fulfill business requirements. Listening to Elaine’s issues, he has identified several systems that need to be integrated. However, he is reluctant to do this point-to-point as the data isn’t needed transactionally and, as such, does not require expensive and complex integrations. Jake has heard that Magenta recently procured a data hub platform called Snowflake and wants to see if this platform could help resolve Magenta’s customer churn issue.
Snowflake as a Data Hub
Snowflake describes its platform as a data lake, data warehouse, and a data hub. While these definitions can have different meanings depending on your perspective, the core concept is having a central hub for your data. Snowflake offers a great platform for this due to its robust connectivity options, scalability, and ease of use. In fact, it’s a central part of increasing an organization’s data agility.
In preparation for his project, Jake, has identified the following systems that need integration:
- Order Management: AS400
- CRM: Salesforce
- Warehouse: Snowflake
- Data Lake: Amazon S3
- BI: Tableau for CRM
As the AS400 system is the oldest, it has limited integration capabilities and resources. As such, Jake has elected to pull data from that system and place it into an AWS S3 bucket. This will help eliminate resource constraints and enable easier access of the order data.
Now that Jake has identified all the systems required, he now has to figure out how to connect the various platforms. He has produced the following diagram that details his desired integration architecture.
As you can see from the diagram above, his desired flow is as follows:
- Data from the Order Management System gets pushed to an AWS S3 bucket
- This data is then consumed by Snowflake
- Since other groups may request CRM data from Salesforce, that data is ingested into Snowflake as well
- Output the data into Tableau for CRM
Jake would also like to avoid the use of a middleware as it introduces additional complexities around procurement and upkeep that Magenta isn’t staffed for at this point. Given the desired dataflow and the requirement for no middleware, let’s examine the ways in which he can connect these systems.
Connecting Data from AWS to Snowflake
Jake would like to move the order data from an AWS S3 bucket into Snowflake. He would like for this to be automated and happen as soon as the order management system drops the file into the S3 bucket. To do so, Jake will need to utilize Snowflake’s built-in Snowpipes. Snowpipe is a feature built into Snowflake that allows admins to automate file ingestion from bucket services like AWS S3, Google Cloud Storage, and Azure Blobs.
Creating a Database and a Table in Snowflake
Before loading the data from AWS to Snowflake, Jake must establish a location for Magenta’s order data. He creates the MAGENTAORDER database through Snowflake’s user interface but copies the SQL code in case he ever wants to create a database from a Worksheet.

CREATE DATABASE MAGENTAORDER;
Jake then enters the database and creates an ORDER_T table to house his rows of data. The columns on the ORDER_T table match the columns on Jake’s AWS file, which comes from AS400. Jake, keeping Tableau CRM’s character limits in mind, decides to build this table through a SQL command so he is able to determine the initial field size.
create or replace TABLE ORDER_T (ORDERID VARCHAR(32000) NOT NULL,ORDERDATE DATE,NUMOFWIDGETS NUMBER(38,0),NUMOFACTVITIES NUMBER(38,0),ACCOUNTID VARCHAR(32000),DELIVERYDATE DATE);
Snowflake also provides a GUI for table creation if so desired.

Setting up a Stage in Snowflake
Next, Jake must create a Stage in Snowflake, which is an intermediary space for his data to stay until he uses commands to load it into the table he created. Jake creates an External Stage to reference the data he has stored in AWS (there are also Internal Stages for files that are stored locally in Snowflake). Jake creates the Stage with the Snowflake UI by specifying the URL of his AWS bucket and providing credentials. He includes the entire process and the SQL for us because he’s really a fine fellow.


CREATE STAGE "MAGENTAORDER"."PUBLIC".MAGENTAORDERS URL = 's3://awsurl/test/' CREDENTIALS = (AWS_KEY_ID = '[YOUR KEY]' AWS_SECRET_KEY = '[YOUR SECRET KEY');
Creating the File Format in Snowflake
Jake is almost ready to copy the data into Snowflake, but first he needs to specify a file format for his data. A file format tells Snowflake what to expect when parsing the file in your staging areas. One format can be used for multiple files of the same type (CSV, JSON, etc).
The order data is stored in AWS as a CSV and contains a header row. Jake creates a File Format within Snowflake that he calls ORDERS, and is now ready to bring over his AWS data.

CREATE FILE FORMAT "MAGENTAORDER"."PUBLIC".ORDERS TYPE = 'CSV' COMPRESSION = 'AUTO' FIELD_DELIMITER = ',' RECORD_DELIMITER = '\n' SKIP_HEADER = 1 FIELD_OPTIONALLY_ENCLOSED_BY = 'NONE' TRIM_SPACE = TRUE ERROR_ON_COLUMN_COUNT_MISMATCH = TRUE ESCAPE = 'NONE' ESCAPE_UNENCLOSED_FIELD = '\134' DATE_FORMAT = 'AUTO' TIMESTAMP_FORMAT = 'AUTO' NULL_IF = ('\\N');
Using the COPY INTO Command
Jake opens a new worksheet in Snowflake and runs the COPY INTO command to import data from his External Stage into the table he’s already created.
					COPY INTO order_t FROM @magentaorders/WidgetOrders.csv
FILE_FORMAT= ORDERS;
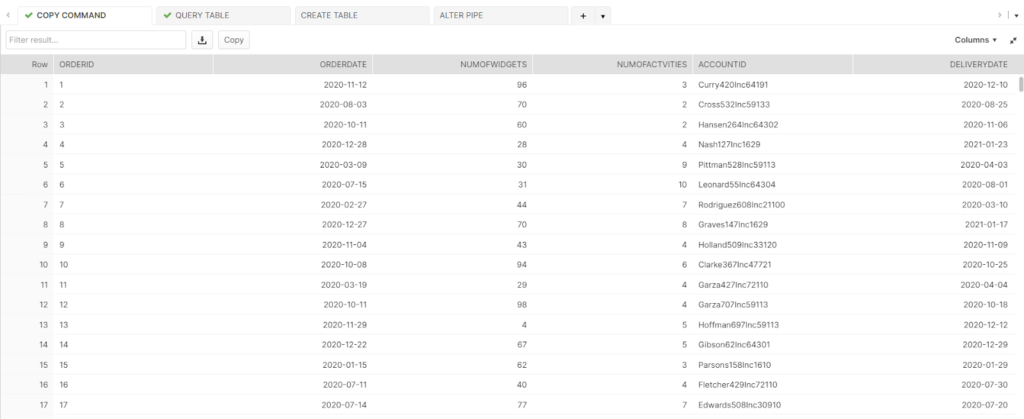
Directly after the COPY INTO command, Jake specifies the table he’s created as the location for the data in Snowflake. Following the FROM clause, Jake mentions his stage followed by a backslash and the AWS file name. Finally, he uses FILE_FORMAT to specify the file type with the format he’s just built. After getting a successful run message, Jake uses the SELECT command to preview his data.

Automating with Snowpipe
Now that Jake has imported data into the ORDERS table, he would like to automate the COPY INTO command by utilizing Snowflake’s Snowpipe feature. The target bucket service utilizes a message notification service to trigger the Snowpipe to begin file ingestion.
To create a Snowpipe, Jake uses the CREATE PIPE command to create a new pipe in the system that will load data from an ingestion queue into tables. When using the CREATE PIPE command, Jake has to specify 3 items: the identifier or name for the pipe, the AUTO_INGEST parameter, which equates to TRUE in order to automatically load data into the Snowpipe via the copy statement, and the file format to use for the pipe.
CREATE PIPE "MAGENTAORDER"."PUBLIC".MAGENTAORDERS AUTO_INGEST = TRUE AS COPY INTO "MAGENTAORDER"."PUBLIC"."ORDER_T" FROM @"MAGENTAORDER"."PUBLIC"."MAGENTAORDERS" FILE_FORMAT = ( FORMAT_NAME = "MAGENTAORDER"."PUBLIC"."ORDERS");
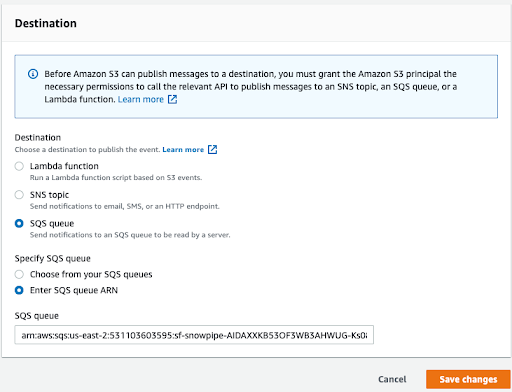
Once the Snowpipe is created, Jake needs to configure the AWS S3 bucket to send notifications to the SQS queue in the Snowpipe. In order to set up the notification, he needs to know which SQS queue to configure on the S3 bucket. He can get the SQS queue by using the SHOW PIPES command in Snowflake. The SQS queue is in the “notification_channel” column.

Once data is available in S3, an SQS queue notifies Snowpipe, triggering the ingestion of the queued files into the table specified in the CREATE PIPE command. Upon creation of the Snowpipe, only new files are initially consumed, but Jake can use the REFRESH command to load historical files thereafter.
Connecting Salesforce to Snowflake
Magenta has shown a desire to gather actionable business insights using machine learning. Jake knows that the company’s Salesforce data will be beneficial to the Data Science team, so he decides to extend a connection to Salesforce in Snowflake. Thankfully, Salesforce offers an easy way to accomplish this via the Sync Out connector.
To begin, Jake enters the Analytics Settings in the Salesforce setup and turns on the Snowflake Output Connection.

From there, Jake enters the Analytics studio, navigates to the Data Manager, and creates the output connection.

Jake syncs the Account object from Salesforce to the MAGENTAORDER database in Snowflake and schedules a regular run time. He then enters Snowflake to verify that the table has populated.

It has! Jake has provided Salesforce data to the Data Science team that they can use to build their model.
Jake’s goal as Senior Data architect was to bring Elaine’s order data to Salesforce to give her a holistic view of her customers. Jake decided to use Snowflake as a data hub, bringing in data from AS400 via AWS. While Elaine is ecstatic to have order data in Salesforce, she needs an easy way to consume and interact with this information. In part 4 of this series, we’ll investigate how to use Tableau for CRM as a system of engagement for your sales teams.
Find out how Atrium can help you tackle customer churn.


